How to use the WordPress Visual Editor
The WordPress Visual Editor is part of every page of your website, and it’s where you can add and edit your content.
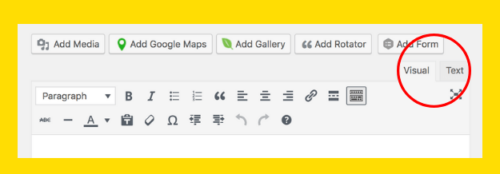
The default setting is “Visual”, and this is suitable for adding a full range of content. If you want to add raw code, you can click on “Text” at the right of the editor box.
Below are explanations about the main features, but play around to make the most of the editor.
Full Editor
Sometimes, you might see only one row of icons in the Editor. To show the full range of icons, click on the Toolbar Toggle icon:

You can also work on a full screen, rather than a box within the page – just click on the icon shown above.
Headings
The default setting for adding text within the Editor is Paragraph. To change this into a heading, click on the arrow alongside the Paragraph/Heading box:
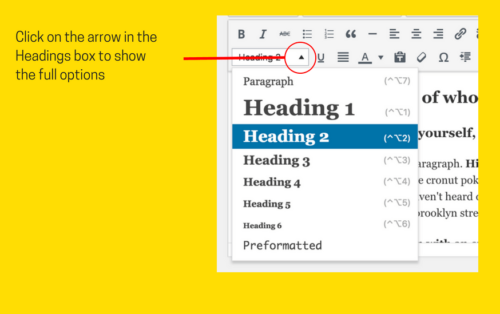
Headings are used by search engines to rate the understand the relative importance of pieces of content. Heading 1 is already used for the Website name, and Heading 2 is already used for the Page name. So Heading 3 is a good place to start for your content, with a Heading 4 added as a sub-heading to draw the reader’s eye to any particularly important points. Use Heading 5 – which we are using here for the “Headings”, “Formatting Text”, etc – to highlight a sub list.
Headings are applied to a whole paragraph, not a section of text within a paragraph – just place the curser anywhere within the paragraph you want to change, and the relevant Heading you select will be applied.
Formatting Text
The Editor contains many of the standard formatting options – Bold, Italic, Bullet Points, Alignment. Hover over any of the icons for an explanation, and highlight any text to apply the formatting.

Pasting Text
If you are pasting text from another source e.g. Word, click on the “Paste as Text” icon beforehand – this avoids any conflict with formatting.

Adding a Link
You can add links either to external content e.g. someone else’s blog that you are recommending, or your Facebook page, or to internal content within your website e.g. About Page, or a blog. Highlight the text you want to make into a link, then click the icon shown:
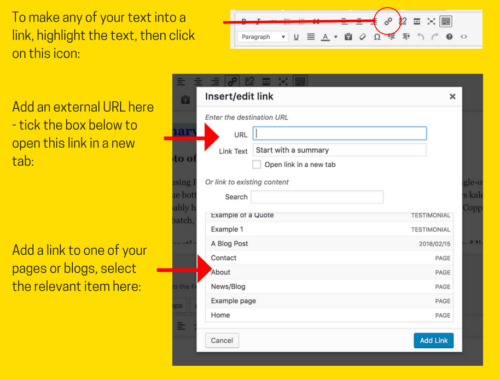
When you have selected the link or added the url, click “Add link” to make sure this is applied to your chosen content.
A useful rule of thumb that we recommend is to tick the “Open link in a new tab” for any external links, but to leave this box unticked for any internal links – that stops people leaving your website unintentionally.
Adding an Email Link
WordPress makes it really easy to make a link go straight to an email. Just write out the email, highlight it, then click on the link button as before:
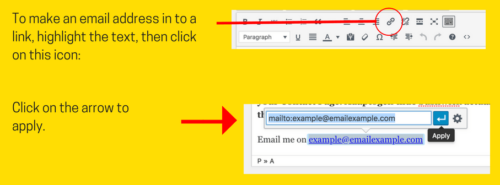
Make sure you click on the arrow to apply the link.
Saving your Content
Whenever you have added content or edited content, always remember to click “Update” on the right-hand side of your page – otherwise your changes will be lost.
Anything else you would like explained about the WordPress Visual Editor? Get in touch – we are here to help. Or check out our Video Tutorials about all aspects of our Flat White WordPress websites here.
Pin for later:
