How to use Gmail to access all your email accounts
If you have a Gmail account you can use it to check and send your emails from other email addresses.
Having a dedicated email address with your own domain name – like hello@bright.website.flatwhitemultisite – is essential for any professional business. But it’s another item on the ever-growing To Do list to check every account separately. Setting up your emails to arrive in a single inbox means that you won’t miss anyone that gets in touch with you.
Here are step-by-step details on how to do this for your own emails.
To avoid confusion on which email accounts I am talking about, I will call the account you are using to view all the different emails your primary account and the added one your secondary account.
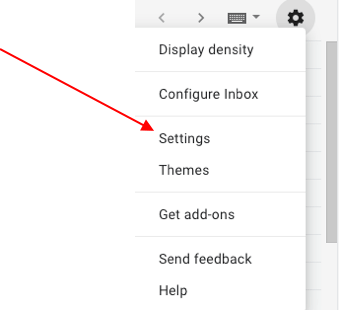
- Click on the “cog” icon at the top-right of your primary Gmail window:

- Click on Settings:
- Click on the “Accounts and Import” tab:

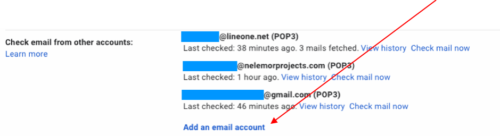
- In the section labelled “Check email from other accounts:”, click on “Add an email account”:
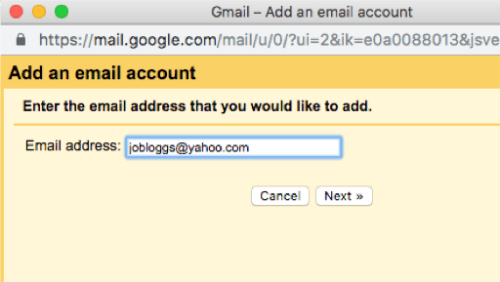
- A new window will open, prompting you to “Enter the email address that you would like to add” so here you add your secondary account e.g. jobloggs@yahoo.com:
- When you click “next” you will be taken to another window and depending on the email domain you will see one of two options – if option 1 (Link accounts with Gmailify) is available (this will only be enabled if your secondary account is with Yahoo, AOL, Outlook or Hotmail), then use it to continue and follow the steps to link the account.
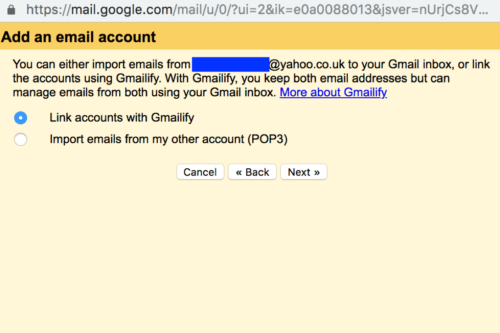
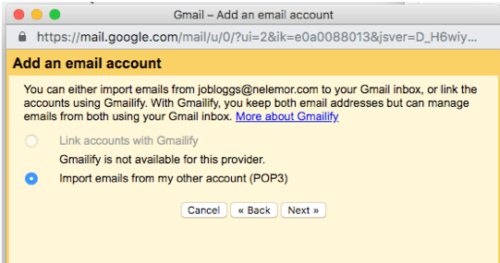
- If Gmailify is not available – you will be told and option 2 (Import emails from my other account) will be enabled – click “Next”:
- This will take you to a new screen:
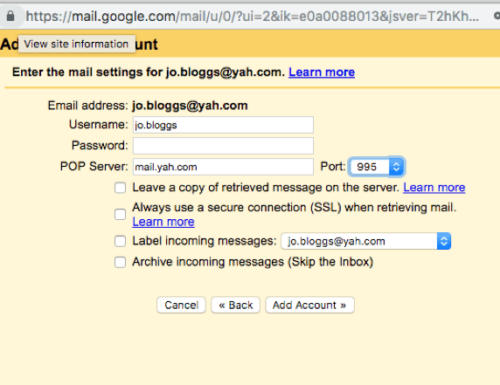
- “Username” should be the one you used to set up the secondary email account e.g.”jo.bloggs”. If it doesn’t work with the username, put in the full email address e.g.”jobloggs@yah.com”.
- “Password” is the password for the secondary email account.
- The provider should have a Help Page detailing POP/POP3 Server settings (Step 12), Port number (Step 13) and SMTP settings (see Step 22 below.)
- POP Server depends on the email provider (e.g. Yah.com, Yahoo.com, Live.com). They will often be in the form of “pop.yah.com”, “pop.mail.yahoo.com” or “pop3.live.com”.
- The Port used for secure message connection is 995. (Some old email providers still use unencrypted emails, which require Port 110, which we don’t recommend.)
- If you use more than one device to retrieve your emails (phone, laptop, desktop, iPad), I recommend ticking “Leave a copy of retrieved message on server”. If you only ever retrieve from one place (e.g. just your phone or just your desktop), you can leave the box unticked, and your emails will only be available to you in your primary Gmail account. If you are adding another Gmail account, Google sometimes stops you from leaving copies – not sure why.
- If you have used Port 995 in Step 13 (very strongly recommended), tick “Always use a secure connection”.
- If you want to be able to tell easily which address email messages are coming from, tick “Label incoming messages” – Gmail will then add a label to the left-hand-side of your screen.
- If you tick the “Archive incoming messages” box, messages will be routed to the label only and not show up in your general inbox.
- Click “Add Account”.
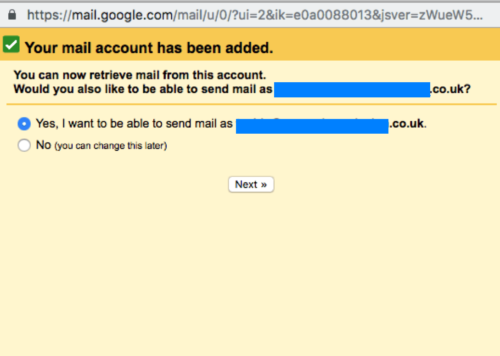
- You will now be offered the opportunity to send emails using the secondary email address you have just added, which we really recommend:
- Click “Next”, and you will be taken to another screen:
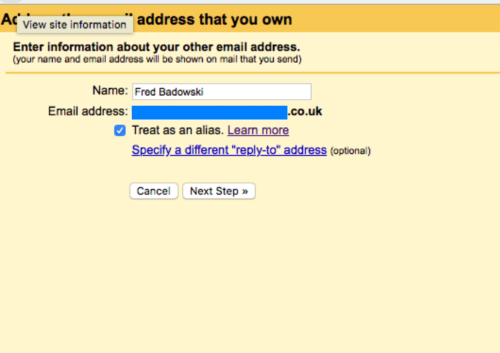
- Here you are asked if you want this sending address to be treated as an alias. I generally tick the box but there is a very useful article by Google that explains the options clearly. I generally ignore the “Specify a different reply-to address”. Click on “Next Step”, and you will be taken to the next screen:

- As in the POP/POP3 settings detailed in Step 12 above, the SMTP server depends on the email provider. The provider will have a Help Page detailing SMTP settings – they will often be in the form of “smtp.gmail.com” or “smtp.live.com” or “smtp.mail.yahoo.com”. The Port used for secure message connection (recommended) is 465. Fill in your Username and Password, click “Add Account”, and you will be taken to this screen:
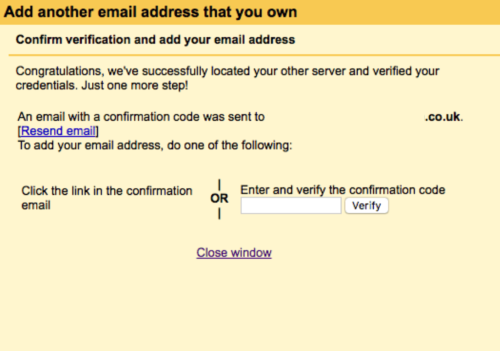
- Check for your confirmation email, which should now be in the inbox of your primary account. Either click on the link in this email, or copy and enter the verification code in the box and click on “Verify”.
- Congratulations – you can now receive and send from the added (secondary) address in one Gmail screen!
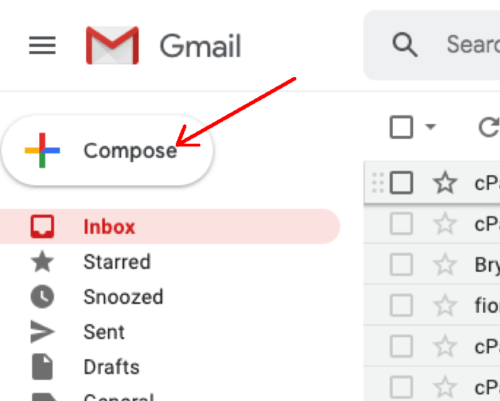
- One more thing – when you click on the compose button to send a new email message:
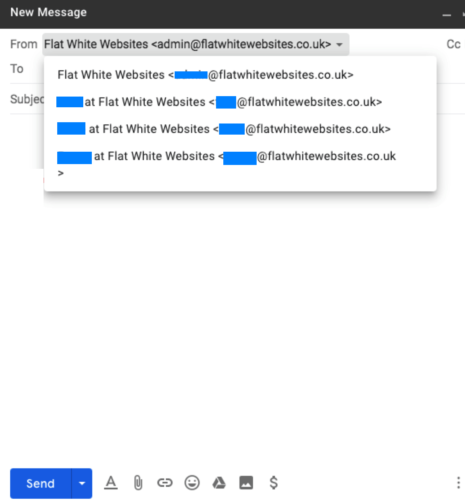
There will be a dropdown arrow to the right of your default email address in the “From” field which will show you all of the “send as” options
HAPPY EMAILING! Now – back to our other useful blogs